Did you know that over 26% of the U.S. population lives with a disability, yet a staggering number of websites remain inaccessible to them? That’s millions of potential customers, readers, and users who face barriers when trying to navigate the digital world. Beyond the moral imperative of inclusivity, website accessibility has become a legal necessity, with ADA-related lawsuits against businesses increasing year after year. Companies of all sizes—from small local businesses to Fortune 500 corporations—have faced costly litigation for failing to make their websites accessible.
But here’s the good news: ensuring your website meets ADA compliance standards doesn’t require a computer science degree or an enormous budget. While professional accessibility audits have their place, there are several straightforward tests you can perform yourself to identify and address common accessibility issues. These simple checks can help you catch the most frequent barriers that prevent people with disabilities from fully experiencing your website.
Whether you’re a business owner, marketer, or content manager, taking proactive steps toward digital accessibility isn’t just about avoiding legal trouble—it’s about creating a welcoming online space for everyone. By implementing these four simple tests, you’ll be well on your way to making your website more inclusive, improving user experience across the board, and potentially expanding your audience reach. Let’s dive into practical, actionable testing methods that you can start using today.
What is ADA Compliance and Why Does It Matter?
The Americans with Disabilities Act (ADA), signed into law in 1990, prohibits discrimination against individuals with disabilities in all areas of public life. While the law predates the modern internet, courts have increasingly interpreted Title III of the ADA—which covers public accommodations—to include websites, particularly those of businesses that serve the public.
ADA compliance for websites means ensuring that people with various disabilities can access, navigate, and interact with your digital content. This includes individuals with visual impairments (including blindness and color blindness), hearing impairments, motor disabilities that affect mouse or keyboard use, and cognitive disabilities that impact how information is processed.
The importance of website accessibility extends far beyond legal compliance. First, there’s the business case: accessible websites reach a broader audience and often provide better user experiences for everyone, not just those with disabilities. Features like video captions benefit people watching in sound-sensitive environments, and clear navigation helps all users find information more quickly. Second, there’s the legal reality: web accessibility lawsuits have surged in recent years, with thousands of cases filed annually. Finally, there’s the ethical dimension—creating an inclusive digital space aligns with corporate social responsibility and demonstrates your commitment to serving all customers equally.
Essential Tools to Get You Started
Before diving into specific tests, familiarize yourself with these free accessibility tools that will make your testing process more efficient and insightful:
- WAVE Web Accessibility Evaluation Tool: This browser extension provides visual feedback about the accessibility of your web content by injecting icons and indicators directly into your page.
- Chrome’s Lighthouse: Built into Chrome DevTools, Lighthouse includes an accessibility audit feature that automatically identifies common issues and provides actionable recommendations.
- Color Contrast Analyzers: Tools like WebAIM’s Contrast Checker help you verify that text and background color combinations meet WCAG standards for readability.
- Screen Readers: NVDA (free for Windows) and VoiceOver (built into Mac and iOS) allow you to experience your website as a screen reader user would.
- Your Keyboard: Sometimes the simplest tool is the most revealing—your keyboard can expose navigation issues that automated tools might miss.
Four ADA Compliance Tests You Can Perform Yourself
Now let’s explore four essential accessibility tests that require no coding knowledge and can be completed in under an hour. These tests address the most common accessibility barriers and will give you a solid foundation for understanding your website’s current accessibility status.
Test #1: Check Color Contrast and Text Legibility
Poor color contrast is one of the most widespread accessibility issues, affecting users with low vision, color blindness, and even those viewing websites in bright sunlight or on lower-quality displays. The Web Content Accessibility Guidelines (WCAG) 2.1 Level AA—the standard most organizations aim for—requires a contrast ratio of at least 4.5:1 for normal text and 3:1 for large text (18pt or 14pt bold and larger).
To test your website’s color contrast:
- Use a color contrast checker tool like WebAIM’s Contrast Checker or the TPGi Colour Contrast Analyser
- Select text and background color combinations from your website and input them into the tool
- Check the contrast ratio results against WCAG standards
- Pay special attention to links, buttons, form labels, and navigation elements
- Don’t forget to test different states (hover, focus, active) of interactive elements
Common problem areas include gray text on white backgrounds, white text on pale colored backgrounds, and link text that relies solely on color to differentiate it from surrounding text. If you find failing combinations, work with your designer or developer to adjust colors while maintaining your brand identity. Often, a slight darkening or lightening of one color is all that’s needed to meet standards.
Test #2: Verify Keyboard Navigation
Many users with motor disabilities, visual impairments, or other conditions rely entirely on keyboards to navigate websites—they don’t use a mouse at all. Your website must be fully functional using only keyboard inputs, primarily the Tab, Enter, and arrow keys.
Here’s how to test keyboard accessibility:
- Close or disconnect your mouse and navigate your website using only your keyboard
- Press the Tab key to move forward through interactive elements (links, buttons, form fields)
- Use Shift+Tab to move backward through elements
- Press Enter to activate links and buttons
- Use arrow keys to interact with radio buttons, dropdowns, and other custom controls
- Watch for a visible focus indicator (usually an outline or highlight) that shows which element currently has focus
During your test, ask yourself: Can I reach every interactive element? Is the tab order logical and intuitive? Can I see where I am on the page? Can I activate all buttons and links? Can I open and close modal windows or dropdown menus? Are there any keyboard traps where focus gets stuck?
Common issues include missing focus indicators (some designers hide these for aesthetic reasons—don’t!), illogical tab order, custom widgets that don’t respond to keyboard inputs, and dropdown menus that can’t be accessed without a mouse. If you discover these problems, they typically require developer intervention to fix properly.
Test #3: Test for Screen Reader Compatibility
Screen readers are software programs that convert digital text into synthesized speech or braille output, enabling blind and visually impaired users to access web content. Testing with a screen reader gives you invaluable insight into how these users experience your website.
To conduct a basic screen reader test:
- Download NVDA (free for Windows) or enable VoiceOver on Mac (Command+F5)
- Navigate to your website and turn on the screen reader
- Listen as the screen reader announces page content, moving through headings, links, and other elements
- Check if headings are properly structured in a logical hierarchy (H1, H2, H3, etc.)
- Verify that links make sense out of context (avoid “click here” or “read more” without additional context)
- Ensure form fields have associated labels that are read aloud
- Confirm that images have meaningful alternative text
- Test that dynamic content updates (like error messages or notifications) are announced
Pay attention to whether the screen reader provides enough context for users to understand and interact with your content. For example, a button labeled simply “Submit” might be unclear if the user can’t easily determine which form it submits. Similarly, if your site relies heavily on visual cues like icons without text labels, screen reader users may not understand the purpose of certain elements.
While becoming proficient with screen readers takes practice, even a basic test will reveal obvious issues like missing alternative text, poor heading structure, or unlabeled form controls. These are often simple to fix with proper HTML markup and ARIA (Accessible Rich Internet Applications) attributes.
Test #4: Audit Image Alt Text and Media Descriptions
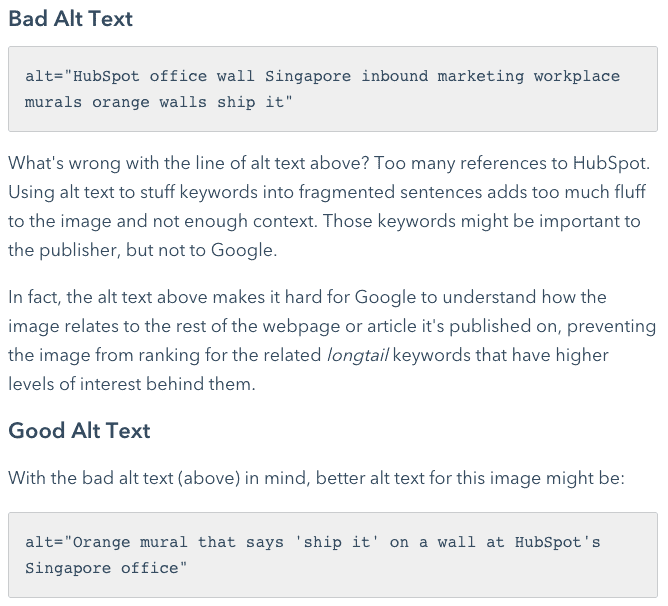
Alternative text (alt text) provides a text alternative to non-text content, making images accessible to screen reader users and serving as a fallback when images fail to load. Every meaningful image on your website should have descriptive alt text, while decorative images should have empty alt attributes (alt=””) to signal that they can be safely ignored.
To audit your images and media:
- Review every image on your key pages (homepage, product pages, blog posts, etc.)
- Right-click images and inspect the HTML code or use a browser extension like WAVE to see alt text
- Evaluate whether the alt text adequately conveys the image’s content and purpose
- Check that complex images like infographics have extended descriptions
- Verify that images used as links or buttons describe the destination or action, not just the image
- Review all video content to ensure it includes captions for dialogue and sound effects
- Confirm that audio content includes transcripts
- Check that videos with important visual information include audio descriptions
Good alt text is concise but descriptive, typically under 150 characters. It should convey the same information or function as the image. For instance, if you have a product image, the alt text should describe the product. If the image is a link to your contact page, the alt text should say “Contact us” rather than describing what the icon looks like.
For videos, captions should include not only dialogue but also relevant sound effects and speaker identification. Audio descriptions narrate important visual information for users who can’t see the video. While creating high-quality captions and descriptions requires some effort, it significantly improves accessibility and also benefits SEO, as search engines can index this text content.
Common Mistakes to Avoid in DIY ADA Compliance Testing
As you begin testing your website for accessibility, be aware of these frequent pitfalls that can undermine your efforts:
Treating accessibility as a one-time project: Accessibility isn’t a checkbox you mark once and forget. Every new piece of content, feature update, or design change can introduce new barriers. Build accessibility testing into your regular workflow and content creation processes.
Adding alt text to decorative images: Not every image needs descriptive alt text. Purely decorative images—those that don’t convey information or serve a functional purpose—should have empty alt attributes (alt=””) so screen readers skip over them. Including unnecessary descriptions creates noise and frustrates users.
Relying solely on automated testing: While tools like WAVE and Lighthouse are valuable, they catch only about 30-40% of accessibility issues. Automated tools can’t determine if alt text is meaningful, if content makes logical sense, or if the user experience is intuitive. Combine automated scans with manual testing for comprehensive results.
Ignoring mobile accessibility: Many people with disabilities use mobile devices as their primary way to access the internet. Test your website’s mobile version with the same rigor as the desktop version, ensuring touch targets are adequately sized, gestures work with assistive technologies, and screen orientation changes don’t break functionality.
Overlooking keyboard-accessible custom components: Developers often create custom dropdowns, sliders, or interactive widgets that look great but don’t work with keyboards or screen readers. If your site uses custom components, these require extra attention to ensure they’re accessible.
Assuming color alone can convey information: Never use color as the only way to communicate information. For example, if required form fields are marked only with red text, color-blind users won’t know which fields are required. Always combine color with text, icons, or other visual cues.
When DIY Testing Isn’t Enough: Professional Help
While the tests outlined in this guide will help you identify and address many common accessibility issues, some situations call for professional accessibility audits:
Consider hiring accessibility consultants or using enterprise-level testing tools if you have a complex web application with custom interactive features, an e-commerce platform with checkout processes and dynamic content, a site that handles sensitive information requiring robust form accessibility, or a large organization facing legal scrutiny or high lawsuit risk.
Professional accessibility audits typically involve both automated scanning and manual testing by experts, including users with disabilities. These audits produce detailed reports identifying issues, prioritizing fixes, and providing code-level recommendations. Services like Deque Systems, Level Access, and TPGi offer comprehensive auditing, while platforms like AudioEye and accessiBe provide ongoing monitoring and automated remediation (though automated solutions should complement, not replace, proper manual testing and development).
The investment in professional accessibility services often pays for itself by reducing legal risk, expanding your customer base, and improving overall user experience and site performance.
Building Long-Term Accessibility Success
Beyond testing, creating and maintaining an accessible website requires ongoing commitment and strategic integration into your processes:
Make accessibility a team priority: Everyone who touches your website—designers, developers, content creators, marketers—should understand basic accessibility principles. Provide training and resources to help team members recognize and prevent accessibility issues in their work.
Stay current with WCAG guidelines: The Web Content Accessibility Guidelines are periodically updated to address new technologies and user needs. WCAG 2.2 was released in 2023 with new success criteria. Stay informed about these changes and plan to implement new requirements as they emerge.
Build accessibility into your design process: It’s much easier and more cost-effective to design with accessibility in mind from the start than to retrofit an inaccessible website. Include accessibility requirements in project briefs, design mockups, and development specifications.
Seek user feedback: Whenever possible, conduct usability testing with actual users who have disabilities. Their insights will reveal issues that even expert auditors might miss and help you understand the real-world impact of accessibility barriers.
Document your efforts: Maintain records of accessibility testing, remediation efforts, and ongoing compliance measures. This documentation demonstrates good faith effort and can be valuable if you ever face legal questions about your website’s accessibility.
Take Action Today for a More Inclusive Tomorrow
Making your website accessible isn’t just about avoiding lawsuits or checking compliance boxes—it’s about recognizing the dignity and value of every user who visits your site. When you remove accessibility barriers, you’re not only opening your digital doors to millions of potential customers and readers with disabilities, you’re also creating a better, more usable website for everyone.
The four tests outlined in this guide—checking color contrast, verifying keyboard navigation, testing screen reader compatibility, and auditing image alt text—provide an excellent starting point for understanding and improving your website’s accessibility. While they won’t catch every issue, they’ll help you identify the most common barriers and give you a foundation for more comprehensive accessibility work.
You don’t need to be a web developer or accessibility expert to make a difference. Start with these simple tests today, fix the issues you discover, and commit to making accessibility an ongoing priority. Every improvement you make creates a more welcoming online experience for users with disabilities—and that’s something worth celebrating.
Ready to begin? Pick one of these four tests and run it on your website this week. You might be surprised by what you discover, and you’ll be taking an important step toward digital inclusivity. Looking for more resources on web accessibility and ADA compliance? Subscribe to our blog for regular updates, practical tips, and expert insights to help you create websites that work for everyone.